Cochinita pibil

My Bride turns 41 tomorrow. As I'm still in my thirties, I have a hard time imagining what it must be like to have reached such a venerable age. (and I will keep rubbing it in until later this year, when I hit forty myself). But because I was taught to value and respect the wisdom that our elders bring to us, I thought I'd make up a special dinner this weekend. 

I've just finished reading a fabulous book - all about one man's quest for the perfect slice of ham, and I was feeling inspired.  


The author, Peter Kaminisky, writes professionally for Field & Stream and Food & Wine. He also used to be the managing editor of National Lampoon, which explains a lot about why I was laughing out loud so often at this truly pleasurable book. 

This says "A brief history of pigkind" if you can't read it. This is my kind of book.


One of his journeys to define the best pork known to the Western Hemisphere took him to Mexico. And he described a dish so perfect that I had to try making it.

Cochinita Pibil is a pork dish traditional to the Yucatan area that combines citric juices and slow, slow roasting of the meat. Traditionaly, it was buried ('pibil'), which isn't exactly practical in New England in January. 

Here's the recipe I used from the book above - with a few modifications of my own to keep it on the simpler side. 

Cochinita Pibil

  • 2-3 lb pork shoulder or butt. I prefer bone-in, but hey. Use what you have. 
  • 1 medium onion, sliced
  • 1.5 cup pork or chicken stock 

Marinade:  

  • 2 tbs achiote seeds or annato powder 
  • 1.5 tsp allspice
  • 1 tsp black pepper
  • 1 tsp cumin
  • 0.5 tsp cinnamon
  • 1 tbsp dried oregano. Mexican oregano if you can get it. 
  • 3 tbsp white/cider vinegar
  • 6 garlic cloves, peeled & diced fine
  • 1 tbsp salt
  • 1 tbsp olive oil
  • 1/4 cup grapefruit juice
  • juice of 1 fresh orange

Directions: 

  • Combine all ingredients of the marinade except the citrus juice. Achiote seeds or annato powder can be found in a reasonably well stocked Mexican aisle (or in a Filipino grocer). It adds both color and some aroma, and is useful for several Spanish dishes. So go ahead - buy a whole pack.  You want the marinade to end up as a paste - you can run it through a food processor, or just grind it up in your mortar & pestle. I did the latter, because I didn't feel like cleaning up the processor afterwards. Besudes, it's fun to mash the hell out of everything.  Now go ahead and add it all to a bowl and add the citrus juice. Traditionally, this is made with bitter orange juice, which can be a little hard to find. So grapefruit juice (which seems to be available anywhere that white people live) and orange juice will do you just fine. 
  • Rub this onto the shoulder - flip and rub the other side. Now put it in the fridge and walk away until the next day. 


  • This will smell like heaven and you will thank me.
  • The next day, pre-heat your oven to 325F. Find your handy dutch oven (le creuset, or other) and heat it up on the stove top. Scrape the marinade out onto a plate (save it!) and sear the pork on the outside in a little oil.  Once browned on all sides, add your marinade scrapings and juice back into the pot, along with a cup and a half of stock, and top with fresh sliced onions.  It should come most of the way up your pork. 

Note: In traditional Mexican cooking, the pot would've been lined with banana leaves, and wrapped around the pork. This retains the juices and allows it to steam itself tender when put into a charcoal lined pit. The dutch oven is doing similar goodness for us here. But if you ever get the chance to cook or eat this the traditional way, you should. 

  • Bring the pot to a boil on the stove, and then pop it, covered, into your pre-heated oven. Come back 3.5 - 4 hours later. Don't bother checking on it in the meantime. Do what we did and go have a birthday eve nap, if you can.  


  • When you pull it out, it should be ready to fall off the bone. Pull the meat out of the liquid and shred it with a couple of forks.  I piled it back into the enamel pan I used to marinade it (cleaned, of course), and squeezed the juice of another orange on top and put it into the oven on a low broil, to crispy-caramelize just a bit while I finished the rest.  
  • Put the liquid from the pot back on the stove and bring to a fast simmer. This reduced sauce becomes a fantastic topping for your tacos. 
  • Top as desired - with a spoonful of the reduced sauce to finish - and serve! 


I served it with a fresh cucumber-pineapple-habenero salsa, roast sweet peppers, slices of avacado and warm tortillas. Accompanied with a grilled corn/tomato/cilantro salad and a squeeze of fresh lime.  The flavor of the pork is nuanced with citrus, garlic and spices. It's an amazing meal. 

This won eye-closed blissful approval from everyone in the house.  Definitely a keeper - and because the shoulder is so big, it's a great entertaining meal as well. It's as easy to cook for 8 as it is for 4. 

I will note that my Bride went a little lighter on the habenero.

But she is over forty now, so we must make allowances, I suppose.
Where I get all snobby about my bacon


In our house, bacon is serious stuff.

We have extended conversations about bacon. We discuss the merits of different styles & different brands the way OC families might discuss fashion. We consider, savor and discuss a new pack of bacon like teenagers might talk about a new song, or that guy that what's-her-name was seen with last week in the mall. 

We are judgmental and picky. Though truth be told, it's hard to find a bacon that we we won't let back into the house, even after a less than stellar review. (There are notable exceptions: the house brand at Whole Foods. It's just sadly unflavorful. And do not utter the words "turkey" and "bacon" in the same sentence in my daughter's presence).

Bacon in our house is divided into three distinct categories:

- American bacon. This is the streaky stuff made from the belly of the pig with a dry rub of salt and potentially a few other flavors (e.g. maple, smoked, etc.)

American bacon is only good when put on top of other things. A salad. A good burger. Candied and crumbled on top of oatmeal. (trust me on this

American bacon is the co-king of "makes things better when put on top". It shares this glory with a fried egg. (Trust me on this one as well. If you see something on a menu topped with a fried egg, I guarantee you it will be one of the best dishes on the menu. I would not lie to you about this. Other things, ok maybe. But not about a fried egg. We're friends like that.)

- Italian bacon. Also known as pancetta. It's made from the same cut of pork belly as American bacon, but with a different cure approach. It's indispensible in a good pasta carbonara, risotto, or diced and fried with a mess of shredded brussel sprouts. (Ok. You can switch out for guanciale - made from the streaky pork cheek - but the effect is nearly the same.) 

I have a great recipe for pancetta. It takes about 6-8 weeks to cure, and considering that I can get a decent Oscar Meyer bacon for a few bucks, but good pancetta costs me more than $20 a pound, all the bellies of my annual autumn pigs are cut & reserved for pancetta, instead of more typical bacon. 

- and best of all: English bacon. Which is the only kind of bacon meaty enough to stand up on its own as a breakfast main in our house. 

So sayeth the Critter. And so it must be true.


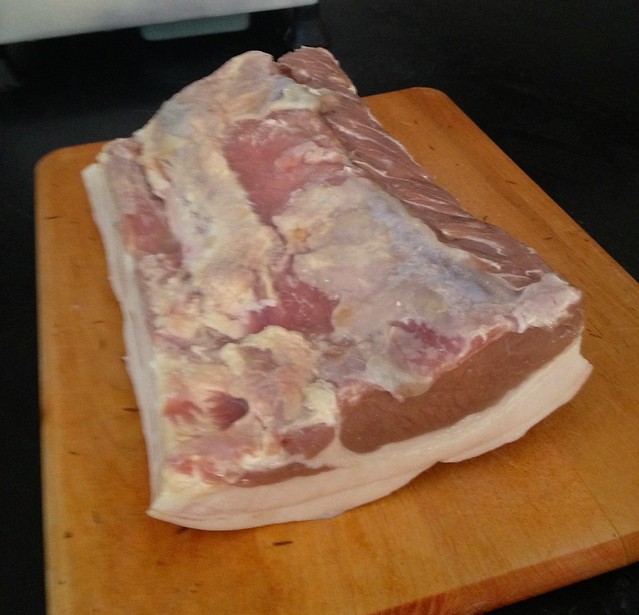
British bacon comes from the loin of the pig, not the belly. Where you get pork chops (without the bone). It's also called 'back bacon', because of where this is located along the pig - It's along the upper side - usually cut (as ours is above) to extend down and include a little of the upper belly (along the left hand side of the picture above).  This is the same cut used for Canadian bacon - usually found on pizza here in the lower part of the continent. (Canadian bacon is cured with more sugar, typically smoked, and is just as often treated as ham here in the U.S. and doesn't rightly belong in the "bacon" category at all, at least in our household). 

I took a picture of this cut above after curing it for about 8 or 9 days. Most American bacon is cured with a 'dry' cure - essentially rubbing it with salt, probably sugar and a few other spices, and maybe smoking it. 

The best traditional British bacon is cured in a wet 'Wiltshire cure' - a brine that the cut is submerged in to soak in all of the delicious flavors.  About half of British bacon sold in stores there is smoked after curing. The rest is sold 'green' or unsmoked. I prefer the unsmoked - both because of the simpler taste, and because it's easier to make. 

The cure is pretty straightforward - I've listed my basic recipe below. 

Wiltshire cure: 

  • 1 gallon of water
  • 1 lb kosher salt
  • 1/2 lb brown sugar
  • 1 heaping tsp pink salt
  • A few crushed juniper berries
  • 1 bay leaf
  • Anything else I happen to grab out of my spice drawer: 10-12 Black peppercorns. A hefty pinch of dried thyme. Nothing if I'm feeling lazy.

Add the salt, sugar & spices to the water in a large stock pot and heat until the salt & sugar are dissolved. Let cool to room temp (I often cover the pot and stick it out on the porch or in the fridge to accelerate things). Add the meat and ensure it is fully submerged (with a plate on top or some other weight) and put into a cool place (basement or garage). Don't bother it again for 5-8 days. I tend to leave mine for 8 or 9. 


At this point, your bacon is ready to slice, cook and eat.

A couple of years ago, I called my Bride a few days before Father's day and told her I knew what I wanted to celerbate my father-ness. A meat slicer.

There was silence on the other end of the phone, and then, "I'm not getting you a meat sli- .... You already have one picked out, don't you?"  

"I'm one click away from having one on our doorstep, baby."

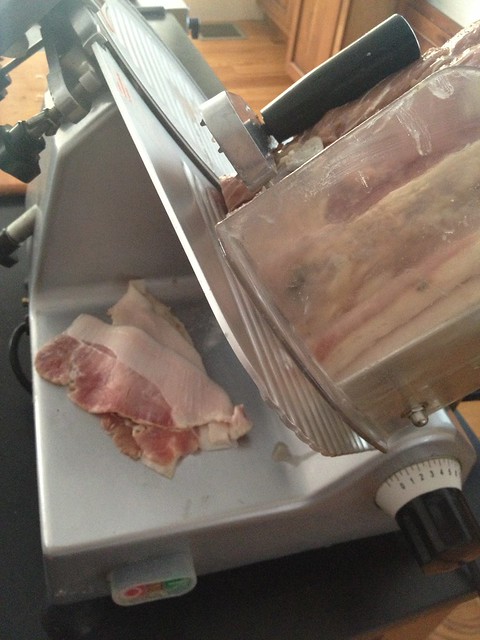
I picked up the one above off of eBay for a two or three hundred bucks, and it's more than adequate for most things. This little deli slicer makes quick work of the bacon. But you could just as well do it with a sharp knife, slicing what you need. (and I have)

I could write a whole other post about what I've learned about meat slicers since buying this one. But as a good, home-use level slicer, it's perfectly adequate. If a pain in the ass to break down and clean afterwards. But hey. Good bacon demands some sacrifice. And I'm ok with that.


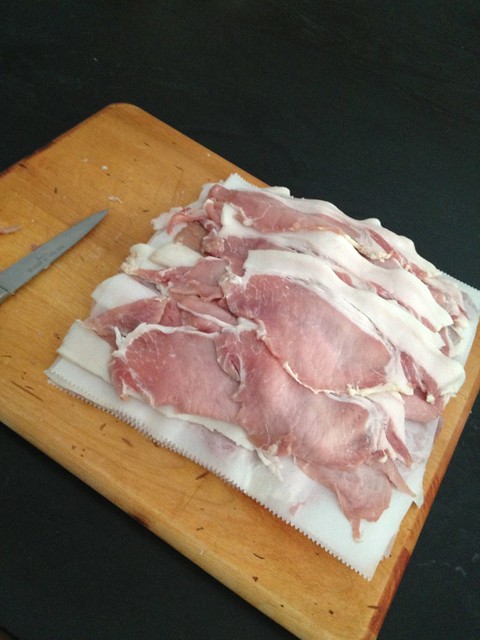
I lay out the bacon on easily sorted sheets of wax paper. You can pick them up in a decent grocery for next to nothing. It keeps things tidy for breakfast, when I have kids clamoring for the stuff. 

The only thing I'll point out about this particular batch of bacon is the extra-thick layer of fat. This pig was beautifully fatted, and I hated to lose too much of it. It could have been sliced off and used to make lardo, but I kept most of it. I sometimes end up trimming that fat off before I cook a slice, or throw it to the dog. But just as often, I end up eating it. Don't say 'ew. gross.' Think of what percentage fat your Oscar Meyer bacon is. That's just flavor. 

Note: If you cut it thicker, you end up with gammon. One of my first lunches with the team in the Liverpool office, I was trying to decipher the menu, and asked someone what this 'gammon' thing was. 

'It's like a bacon steak,' one of the guys said. 

Bacon steak. Holy shit. You just combined two of my favorite concepts in one fantastic meal. And they serve it with a fried egg on top. 

A half inch slice of Wiltshire cured pork loin (bacon), griddled with an egg and served with good pub chips and taken with a pint of beer, and you're in heaven, my friend. It is not to be missed.


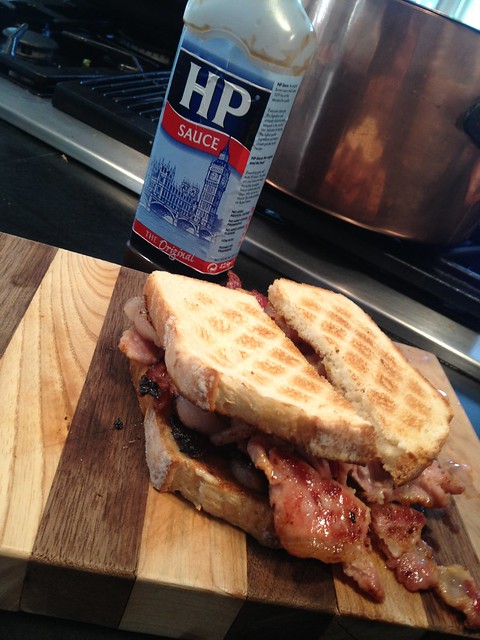
However, this is how I like my bacon best. Griddled in a pan, and put between two pieces of good toast, buttered and hot. A good, traditional 'bacon buttie'. 

Lots of Brits top it with a bit of brown sauce (the HP stuff behind it - we keep it around because my Bride likes it). But I'm a simple man. 

This right here - this is good bacon. And is one more example that the Brits - despite the rumors - do know what they're doing in the kitchen. 

I would write more. But my bacon buttie is getting cold. 

Street style tacos: Braised beef shank


I posted this picture to Instagram & Facebook, and a few folks asked for the recipe. It was ridiculously easy, and a great way to use a cheaper cut of meat. It's a little hard to create a "recipe" out of this, as I did it mostly by feel and what was handy. But for what it's worth, here you go. 

The Beef: 

I used a couple of hefty slabs of beef shank (cross cut right across the lower foreleg or shin of our steer) that I had in the freezer. We have lots of cuts like this - tougher, lankier cuts from the parts of the cow that aren't porterhouse or flank steak.  These can end up in your grocery store isle as "stew meat" or typically minced by your butcher into ground beef. Otherwise, you'll find them left whole as your cheaper pot roast options. If you have a decent butcher department or shop near you, you can ask for shank or other cuts for a fraction of the cost of your more popular cuts. I have one advantage in pulling this from our stash - this came from the dry-aged half of the steer, and was especially flavorful. 

Used: Bone-in shanks (x2) - net weight, about 2 pounds. You could easily subsitute just about any cheap, meaty cut. Look for 'London Broil' on sale at the grocery store (which technically isn't a cut of meat. It's a method of preparation for a tougher portion of beef). 

The Liquid: 

I braised the beef shanks (otherwise, they'd be tough and unenjoyable). Braising is simply a way to cook it long and slow, with moisture, and is really handy when you have cheap, tough meat cuts. Typically, I would sear the meat first. But I was lazy. I just put the two shanks into a small casserole dish, and poured in a quart of plain tomato sauce. I had the luxury of being able to send the Critter down to the basement and pull up a jar my Bride had made and canned last summer. But any decent tomato sauce will do. You want the liquid to be about 2/3 the way up the side of the meat. Not covering. But a pretty healthy amount. 

The spices: 

 I added two packs of McCormick's fajita seasoning. This dirty little secret is my go-to Mexican mix of spices. I could (and have) made my own blend of cumin, garlic, chiles, salt & pepper. But I just as often don't bother. It's good, and cheap and quick. And when I'm lazy, it's the perfect blend. Note: I never use the packet of taco mix this way. I don't know what's the difference between the two. Except this: One is great. One is crap. 

If you want to make it from scratch, I'd use about something like the following for 1 qt of sauce: 

  • 1 or 2 tsp cumin
  • 2 cloves garlic, smashed
  • 1 tsp salt
  • 1 or 2 tsp smoked paprika
  • 1 tsp dried oregeno
  • 0.5 tsp salt (or to taste)
  • 0.5 tsp cayenne pepper. (or to taste)

I tend to like my flavors on the strong & spicy side. So feel free to adjust to your pallette.

The cooking: 

I cooked this at a simmer in the oven (about 275-300 degrees) for 4 hours or so. When done, I sliced the meat off the bone, and into 1/4" wide strips (against the grain). Then I put the meat back into the sauce and left it warm on the side of the oven while I quickly finished up the rest of the fixings.

Salsa fresca: 

 There are hundreds of easy recipes here. But it comes down to a few basic ingredients.

  • Tomatoes
  • Onions
  • Cilantro
  • Chili
  • Lime

Chop. Stir. By default, I use roughly equal-ish amounts of the first three. And generally one or two diced jalepenos (or a few dashes of tabasco, if I'm out of fresh chiles). Squeeze the juice of one lime over it all. Add a pinch or two of kosher salt, and chill in your fridge for a half hour or so, if you have the time. Make extra. So you can make the next part.

Guacamole:

The easiest way to make guacamole is to add a heaping serving spoon of the salsa above to a couple of mashed avacados. Mix together, and boom. Add more lime juice if you like. (and who doesn't?)

Eat:

At my house, I'm pretty much the only fan of corn tortillas. The ones in the photo above are really small, taco-truck style. I bought them in LA on our last trip and brought them back. They can last quite nicely in the freezer for months. For real taco-truck style, take two small ones like above, warm them over an open flame (or on a dry cast iron skillet) and stack them on top of each other. Then top with your beef, salsa and a dollop of guac, and you're good to go, just like that. You can add a slice or two of jalepeno to the top if you're feeling feisty. 

For the rest of my family, they like flour tortillas. Basically the same treatment: warm over open flame for a few seconds. Fill. Eat. Repeat. 

Boom. Easy tacos: street style.